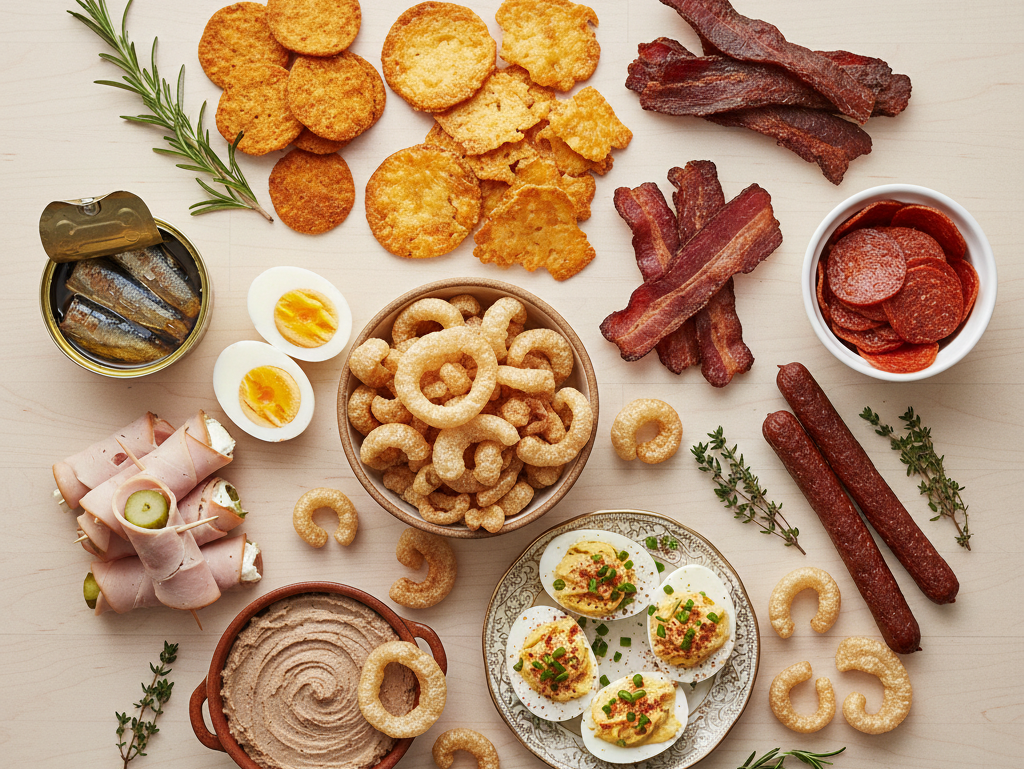
20+ Easy Zero Carb Meal Prep Snack Ideas
Snacking on a zero carb diet can seem hard at first. When you walk down the snack aisle at the store, almost everything is full of carbs. Chips, crackers, candy bars, and pretzels are all off limits.
But that does not mean you cannot snack. You just have to be smart about it. The best zero carb snacks are made from animal products. They are high in protein and healthy fats. These kinds of snacks will keep you full and satisfied between meals.
The key is to be prepared. If you have good snacks ready to go, you will not be tempted to reach for something you should not eat. This guide gives you over 20 ideas for zero carb snacks. Many of them are perfect for making ahead of time.
What Makes a Good Zero Carb Snack?
A zero carb snack is made from animal products. It has no carbohydrates. Good zero carb snacks are high in protein and fat. This helps you stay full.
Here are the main types of zero carb snacks:
- Meat Based Snacks: Beef jerky, pork rinds, and deli meats.
- Poultry Snacks: Cooked chicken wings or turkey slices.
- Seafood Snacks: Canned tuna, canned salmon, smoked salmon, and sardines.
- Egg Snacks: Hard boiled eggs and deviled eggs.
- Cheese Snacks: Hard cheeses and cheese crisps.
- Fats: Butter and tallow are used in cooking, but are not snacks by themselves.
Now let us look at over 20 easy zero carb snack ideas. For many of them, there is a full recipe with step by step instructions.
Savory and Crunchy Snacks
Sometimes you just want something crunchy. These snacks will satisfy that craving.
1. Crispy Pork Rinds (Chicharrones)
Pork rinds are the perfect zero carb crunchy snack. You can buy them at the store, but making them at home is fun and lets you control the ingredients.
Yields: 4 to 6 servings
Prep time: 5 minutes
Cook time: 1 to 2 hours for rendering, then 5 to 10 minutes for frying
Ingredients:
- 1 pound pork skin with a thin layer of fat attached
- Salt to taste
- Lard or tallow for frying
Step by step instructions:
- Cut the pork skin into small squares, about 1 to 2 inches wide.
- The first step is to render the fat. Put the pork skin in a large pot with a small amount of water. Cook over low heat for 1 to 2 hours. The skin will release its fat and start to dry out.
- Another way to do this is to dehydrate the pork skin. You can use a food dehydrator or your oven set to a very low temperature, like 170 degrees Fahrenheit. Let it dry for 8 to 10 hours. The skin should be hard and brittle.
- When the skin is dry, it is time to fry. Heat a few inches of lard or tallow in a deep pot. Use a thermometer to get the oil to 400 degrees Fahrenheit.
- Carefully add a handful of the dried pork skin pieces to the hot oil. They will puff up and become crispy in just a few seconds.
- Use a slotted spoon to take the puffed pork rinds out of the oil. Put them on a wire rack to drain. Sprinkle with salt while they are still hot.
- Repeat with the rest of the pork skin.
Meal prep and storage:
Store the homemade pork rinds in an airtight container at room temperature. They will stay good for up to a week.
2. Cheese Crisps
These are crunchy, savory, and very easy to make. They are a great replacement for crackers or chips. You only need one ingredient.
Yields: Varies
Prep time: 2 minutes
Cook time: 5 to 7 minutes
Ingredients:
- Your favorite hard cheese. Parmesan, cheddar, or provolone all work well. You can use shredded cheese or sliced cheese.
Step by step instructions:
- Turn your oven on to 400 degrees Fahrenheit (200 degrees Celsius). Line a baking sheet with parchment paper.
- If you are using shredded cheese, put small piles of cheese on the baking sheet. Use about 1 tablespoon for each pile. Leave a few inches of space between them because they will spread out.
- If you are using sliced cheese, just put the slices on the baking sheet.
- Bake for 5 to 7 minutes. Watch them closely. They are done when the cheese is melted, bubbly, and the edges are golden brown.
- Let the cheese crisps cool on the baking sheet for a few minutes. They will get hard as they cool. Then, you can peel them off the paper.
Meal prep and storage:
Store the cooled cheese crisps in an airtight container at room temperature. They will stay good for up to a week. They might lose some crispness over time.
3. Homemade Beef Jerky
Store bought jerky often has a lot of added sugar. Making your own lets you control what goes in it. It is a perfect high protein snack to take with you anywhere.
Yields: About 1 pound of jerky
Prep time: 20 minutes, plus marinating time
Cook time: 4 to 6 hours
Ingredients:
- 2 pounds lean beef, like top round or flank steak
- 1/2 cup coconut aminos or tamari (make sure it has no added sugar)
- 1 tablespoon liquid smoke (this is optional)
- 1 teaspoon garlic powder
- 1 teaspoon onion powder
- 1/2 teaspoon black pepper
Step by step instructions:
- Slice the beef into thin strips. Cut against the grain. The strips should be about 1/8 to 1/4 inch thick.
- In a large bowl, make the marinade. Mix together the coconut aminos, liquid smoke, garlic powder, onion powder, and black pepper.
- Add the beef strips to the bowl. Toss them so they are all coated in the marinade. Cover the bowl and put it in the fridge. Let it marinate for at least 4 hours. Overnight is even better.
- When you are ready to dry the jerky, preheat your oven to its lowest setting. This is usually around 170 degrees Fahrenheit. If you have a food dehydrator, you can use that instead. Set it to 160 degrees Fahrenheit.
- Take the beef out of the marinade. Pat the strips dry with paper towels. This helps them dry faster.
- Arrange the beef strips in a single layer on wire racks. Put the racks over baking sheets to catch any drips. Or, put them directly on the dehydrator trays.
- Dry the jerky for 4 to 6 hours. The time will depend on how thick your slices are. The jerky is done when it is dry and leathery, but still a little pliable. It should not be brittle.
Meal prep and storage:
Store the beef jerky in an airtight container at room temperature. It will stay good for up to a month.
4. Crispy Bacon Strips
Bacon is a simple and classic snack. A few crispy strips can really hit the spot when you want something savory.
Yields: Varies
Prep time: 2 minutes
Cook time: 15 to 20 minutes
Step by step instructions:
- Turn your oven on to 400 degrees Fahrenheit (200 degrees Celsius).
- Arrange the bacon slices in a single layer on a baking sheet. You can line it with parchment paper for easy cleanup.
- Bake for 15 to 20 minutes. Keep an eye on it. Take it out when it is as crispy as you like.
- Put the cooked bacon on a plate lined with paper towels. This will soak up any extra grease.
Meal prep and storage:
Cook a large batch of bacon at once. Store it in the fridge for up to a week. You can eat it cold, or reheat it quickly in a skillet or microwave.
5. Pepperoni Slices
Pepperoni is one of the easiest zero carb snacks. You can eat it right out of the package. Or, you can bake it to make crispy chips.
Step by step instructions for pepperoni chips:
- Turn your oven on to 400 degrees Fahrenheit (200 degrees Celsius).
- Arrange pepperoni slices in a single layer on a baking sheet.
- Bake for 5 to 7 minutes. They will get crispy.
- Let them cool. They will get even crispier as they cool.
Meal prep and storage:
Just keep a package of pepperoni in your fridge. It is always there when you need a quick snack.
Protein Packed Portable Snacks
These snacks are great for taking with you. Pack them in your bag for work, school, or travel.
6. Perfect Hard Boiled Eggs
Hard boiled eggs are a nutritional powerhouse. They are simple, portable, and packed with protein. Make a batch at the start of the week.
Yields: 12 eggs
Prep time: 2 minutes
Cook time: 15 to 18 minutes
Ingredients:
- 12 large eggs
- Cold water
- Ice
Step by step instructions:
- Place the eggs in a single layer in a large pot. Cover the eggs with cold water by at least 1 inch.
- Bring the water to a rolling boil over high heat.
- Once the water is boiling, turn off the heat. Put a lid on the pot. Let the eggs sit in the hot water for 10 to 12 minutes.
- While the eggs are sitting, prepare an ice bath. Fill a large bowl with cold water and ice.
- Using a slotted spoon, carefully transfer the cooked eggs from the pot to the ice bath. Let them cool for at least 5 minutes.
- To peel, gently tap the egg on a hard surface. Roll it between your hands to loosen the shell. The shell should come off easily.
Meal prep and storage:
Store unpeeled hard boiled eggs in an airtight container in the fridge for up to one week. For best results, peel them just before eating.
7. Classic Deviled Eggs
Deviled eggs are a classic for a reason. They are a delicious and satisfying snack.
Yields: 12 deviled eggs
Prep time: 15 minutes
Ingredients:
- 6 hard boiled eggs, peeled and cut in half lengthwise
- 1/4 cup mayonnaise
- 1 teaspoon Dijon mustard
- Salt and pepper to taste
- Paprika for garnish
Step by step instructions:
- Carefully take the yellow yolks out of the hard boiled egg halves. Put the yolks in a small bowl.
- Mash the yolks with a fork until they are a fine crumble.
- Add the mayonnaise, Dijon mustard, salt, and pepper to the mashed yolks. Mix until it is smooth and creamy.
- Use a spoon to put the yolk mixture back into the egg white halves. You can also use a piping bag to make it look fancy.
- Sprinkle a little paprika on top for color.
Meal prep and storage:
Store the deviled eggs in a single layer in an airtight container in the fridge for up to 3 days.
8. Deli Meat Roll Ups
This is one of the simplest snacks. No cooking required. Just roll up your favorite deli meat with cheese or cream cheese.
Ingredients:
- Deli meat like turkey, ham, or roast beef. Check the label to make sure there is no added sugar.
- Sliced cheese or cream cheese.
Step by step instructions:
- Lay a slice of deli meat flat on a plate or cutting board.
- If you are using sliced cheese, put a slice on top of the meat. If you are using cream cheese, spread a thin layer over the meat.
- Roll the meat up tightly. You can eat it as is, or slice it into smaller pinwheels.
Meal prep and storage:
You can assemble these just before eating. Or, you can make a batch and store them in the fridge for up to 2 days.
9. Meat Sticks
Meat sticks are the ultimate convenience snack. Look for high quality brands like Chomps or Epic. They are often made with 100 percent grass fed beef and have no added sugar or fillers. They are easy to keep in your bag or desk.
10. Canned Tuna or Salmon
Canned fish is shelf stable, portable, and packed with protein and healthy omega 3s. Keep a few cans in your pantry. When you need a snack, just open a can and eat it with a fork.
11. Smoked Salmon and Cream Cheese Bites
This is an elegant snack that feels like a treat. It is very easy to put together.
Step by step instructions:
- Spread a thin layer of cream cheese on a slice of smoked salmon.
- Roll the salmon up tightly.
- You can leave it as a roll, or slice it into smaller pinwheels.
Meal prep and storage:
These are best assembled just before eating. But you can store them in the fridge for up to 2 days.
12. Leftover Meatballs
When you make a batch of zero carb meatballs for dinner, make extra. Keep them in the fridge for a quick and easy snack. They are good cold or reheated.
13. Cooked Chicken Wings
Leftover chicken wings make a fantastic snack. If you have wings from dinner, save them. You can eat them cold. Or, reheat them in an air fryer to get them crispy again.
14. Sardines
Do not be afraid of sardines. They are a true nutritional powerhouse. They are packed with protein, calcium, and healthy omega 3 fats. Look for sardines packed in olive oil or water. You can eat them right out of the can.
Savory Bites and Dips
These snacks are a little more involved. They are perfect for when you have a little more time, or for a fun weekend snack.
15. Bacon Wrapped Jalapeño Poppers
These are spicy, savory, and cheesy. They are perfect for game day or any time you want a flavor packed snack.
Yields: 12 poppers
Prep time: 15 minutes
Cook time: 20 to 25 minutes
Ingredients:
- 6 jalapeños, cut in half lengthwise and seeds removed
- 4 ounces cream cheese, softened
- 1/2 cup shredded cheddar cheese
- 6 slices of bacon, cut in half
Step by step instructions:
- Turn your oven on to 400 degrees Fahrenheit (200 degrees Celsius).
- In a small bowl, mix together the softened cream cheese and shredded cheddar cheese.
- Fill each jalapeño half with the cheese mixture. Do not overfill.
- Wrap each stuffed jalapeño with a half slice of bacon. The bacon should cover the opening to hold the cheese in.
- Place the poppers on a baking sheet.
- Bake for 20 to 25 minutes. The bacon should be crispy and the jalapeños should be tender.
Meal prep and storage:
You can assemble the poppers ahead of time. Put them in a container in the fridge for up to 2 days. Then, just bake them when you are ready to eat.
16. Carnivore Style Scotch Eggs
A Scotch egg is a hard boiled egg wrapped in sausage meat. It is a hearty, satisfying snack that is pure protein.
Yields: 6 servings
Prep time: 15 minutes
Cook time: 25 to 30 minutes
Ingredients:
- 6 hard boiled eggs, peeled
- 1 pound ground sausage
Step by step instructions:
- Turn your oven on to 400 degrees Fahrenheit (200 degrees Celsius). Line a baking sheet with parchment paper.
- Divide the ground sausage into 6 equal portions.
- Flatten one portion of sausage into a thin patty.
- Place a hard boiled egg in the center of the patty. Carefully wrap the sausage around the egg, covering it completely. Make sure there are no gaps.
- Place the wrapped egg on the baking sheet. Repeat with the remaining eggs and sausage.
- Bake for 25 to 30 minutes. The sausage should be cooked through and browned.
Meal prep and storage:
Store the cooked Scotch eggs in an airtight container in the fridge for up to 4 days. They are good cold or reheated.
17. Bone Broth
Bone broth is a warm, savory drink. It is very comforting, especially on a cold day. It is also very nutritious. You can sip it from a mug like tea.
Meal prep and storage:
Make a large batch of bone broth. Store it in the fridge for up to a week. Or, freeze it in individual portions. When you want some, just heat it up on the stove.
18. Chicken Liver Pâté
Chicken livers are incredibly nutrient dense. Pâté is a rich, creamy spread. It is a delicious way to eat liver.
Yields: About 1.5 cups
Prep time: 10 minutes
Cook time: 15 minutes
Ingredients:
- 1 pound chicken livers
- 4 tablespoons butter, divided
- 1/4 cup heavy cream
- Salt and pepper to taste
Step by step instructions:
- Put a skillet on the stove over medium heat. Melt 2 tablespoons of the butter.
- Add the chicken livers to the skillet. Cook for 5 to 7 minutes. They should be browned on the outside but still a little pink on the inside. Do not overcook them or they will be tough.
- Carefully put the cooked livers into a food processor. Add the remaining 2 tablespoons of butter, the heavy cream, salt, and pepper.
- Blend until the mixture is completely smooth and creamy.
- Spoon the pâté into a jar or small container. Put it in the fridge to chill for at least 2 hours. This will make it firm up.
Meal prep and storage:
Store the pâté in an airtight container in the fridge for up to a week. Eat it with pork rinds or celery sticks.
19. Smoked Oysters or Mussels
Canned smoked oysters and mussels are a delicious and convenient snack. They are savory and flavorful. You do not need to do anything to them. Just open the can and eat them.
20. Pork Rind Nachos
This is a fun and satisfying way to enjoy nacho flavors without the carbs. Use pork rinds as the chips.
Step by step instructions:
- Spread a layer of pork rinds on a plate.
- Top them with cooked ground beef, shredded cheese, and maybe some jalapeños.
- You can put the plate in the microwave for a few seconds to melt the cheese, or just enjoy it as is.
- Add a dollop of sour cream on top.
21. Crispy Chicken Skin
Do not throw away chicken skin. It can be turned into a delicious, crunchy snack.
Step by step instructions:
- Turn your oven on to 375 degrees Fahrenheit (190 degrees Celsius).
- Spread the chicken skins in a single layer on a baking sheet. Make sure they are not overlapping.
- Sprinkle them with a little salt.
- Bake for 15 to 20 minutes. Keep an eye on them. They are done when they are golden brown and crispy.
- Let them cool on the baking sheet. They will get even crispier as they cool.
Final Thoughts
Snacking on a zero carb diet is easy when you are prepared. With these 20 ideas, you have many options. You can have crunchy snacks like pork rinds and cheese crisps. You can have portable snacks like hard boiled eggs and meat sticks. You can have fun snacks like jalapeño poppers and nachos.
The key is to make these snacks ahead of time. Spend a little time on the weekend cooking bacon, boiling eggs, and making meatballs. Then, when hunger strikes during the week, you have a healthy, zero carb snack ready to go.
Keep a variety of these snacks on hand. You will stay satisfied and on track with your zero carb lifestyle.
Disclaimer: This article is for informational purposes only. Please talk to a doctor or healthcare professional before making big changes to your diet.