10 Thanksgiving Recipes + 10 DIY Crafts for a Memorable Holiday
Thanksgiving is more than a big meal. It is a special day set aside to stop, gather, and give thanks. It is a time for gratitude, family, and creating warm memories together.
To help you celebrate, we have put together a complete guide. You will find 10 delicious Thanksgiving recipes to fill your table. We also have 10 simple and fun DIY craft ideas to decorate your home. These projects will help everyone feel the holiday spirit.
Let us make this Thanksgiving a joyful celebration of food, family, and thankfulness.
10 Delicious Thanksgiving Recipes
These recipes mix classic holiday flavors with fresh, wholesome ingredients. They are perfect for your Thanksgiving feast.
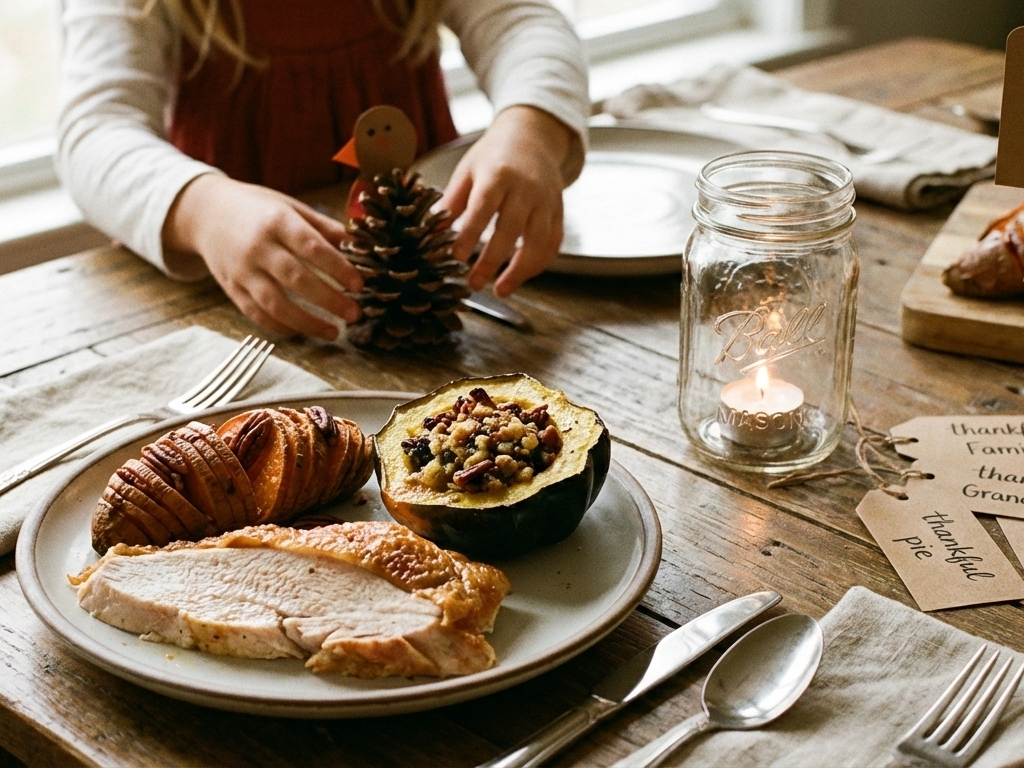
Recipe 1: Honey Brined Turkey
Brining your turkey in a honey salt water mix is the secret to incredibly juicy, flavorful meat.
Ready in: 4 hours (plus 12-24 hours to brine)
Serves: 10-12 people
What you need for the brine:
- 1 gallon water
- 1 cup honey
- 1 cup kosher salt
- 1 head of garlic, halved
- 2 oranges, quartered
- 4 sprigs fresh rosemary
- 1 tablespoon whole peppercorns
What you need for the turkey:
- 1 whole turkey (12-14 lbs), thawed
- 4 tablespoons butter, softened
- 2 teaspoons dried thyme
- Salt and pepper
- 1 onion, quartered
- 2 carrots, chopped
- 3 stalks celery, chopped
How to make it:
- Make the brine: In a large pot, combine the water, honey, and salt. Heat gently until the salt and honey dissolve. Remove from heat. Add the garlic, oranges, rosemary, and peppercorns. Let the brine cool completely.
- Brine the turkey: Place your thawed turkey in a very large clean bucket or pot. Pour the cool brine over the turkey, adding more cold water if needed to fully submerge it. Cover and refrigerate for 12-24 hours.
- Cook the turkey: Preheat your oven to 325°F. Take the turkey out of the brine and rinse it well under cold water. Pat it completely dry with paper towels.
- Mix the softened butter with the dried thyme. Gently loosen the skin over the turkey breast and rub half of the butter underneath. Rub the rest all over the outside of the turkey. Season well with salt and pepper.
- Place the onion, carrots, and celery in the bottom of a roasting pan. Set the turkey on top of the vegetables.
- Roast the turkey for about 3 to 3.5 hours, or until a meat thermometer inserted into the thickest part of the thigh reads 165°F. If the skin starts to get too dark, cover it loosely with foil.
- Once cooked, take the turkey out of the oven. Let it rest for at least 30 minutes before carving. This lets the juices settle back into the meat.
Why everyone loves it: The honey brine makes the turkey unbelievably moist and gives the skin a beautiful golden color. It is the star of the Thanksgiving table.
Recipe 2: Stuffed Acorn Squash with Spinach, Cheese & Pancetta
These individual stuffed squashes are a beautiful and tasty side dish or vegetarian main.
Ready in: 1 hour
Serves: 4 people
What you need:
- 2 medium acorn squash
- 2 tablespoons olive oil, divided
- Salt and pepper
- 4 oz pancetta, diced
- 1 small onion, chopped
- 2 cloves garlic, minced
- 5 oz fresh spinach
- 1/2 cup shredded mozzarella cheese
- 1/4 cup grated Parmesan cheese
- 1/4 cup breadcrumbs
How to make it:
- Preheat oven to 400°F. Cut each acorn squash in half from stem to bottom. Scoop out the seeds.
- Brush the cut sides of the squash with 1 tablespoon of olive oil. Season with salt and pepper. Place them cut-side down on a baking sheet.
- Roast for 25-30 minutes, until just tender when pierced with a fork.
- While the squash roasts, make the filling. In a large skillet, cook the diced pancetta over medium heat until crispy. Remove with a slotted spoon and set aside.
- In the same skillet with the pancetta fat, add the remaining olive oil. Cook the onion until soft, about 5 minutes. Add the garlic and cook for 1 more minute.
- Add the fresh spinach to the skillet and cook until it wilts. Remove from heat.
- Stir in the cooked pancetta, mozzarella cheese, and half of the Parmesan cheese.
- Flip the roasted squash halves over so they are like little bowls. Divide the filling among the four halves.
- Mix the breadcrumbs with the remaining Parmesan cheese. Sprinkle this mixture over the top of each stuffed squash.
- Return to the oven for 15-20 more minutes, until the filling is hot and the topping is golden brown.
Why everyone loves it: It is a complete, flavorful package. The sweet squash, salty pancetta, and melted cheese are a perfect combination.
Recipe 3: Hasselback Sweet Potatoes with Pecans & Orange-Rosemary Glaze
These sweet potatoes are sliced thinly, roasted until tender, and topped with a sticky, fragrant glaze.
Ready in: 1 hour 15 minutes
Serves: 6 people
What you need:
- 6 medium sweet potatoes, scrubbed
- 3 tablespoons olive oil or melted butter
- Salt
- 1/2 cup chopped pecans
- For the glaze: 1/4 cup honey, 1/4 cup fresh orange juice, Zest of 1 orange, 1 sprig fresh rosemary, 2 tablespoons butter.
How to make it:
- Preheat oven to 425°F.
- Make the “Hasselback” cuts: Place a sweet potato on a cutting board between two chopsticks or wooden spoon handles. The chopsticks will stop your knife from cutting all the way through. Make thin slices, about 1/8-inch apart, along the length of the potato. Repeat with all potatoes.
- Place the sliced potatoes on a baking sheet. Brush them generously with olive oil, making sure to get between the slices. Sprinkle with salt.
- Roast for 45-50 minutes, until the potatoes are tender and the edges of the slices start to curl and crisp.
- Make the glaze: While the potatoes roast, combine the honey, orange juice, orange zest, and rosemary sprig in a small saucepan. Simmer for 5-7 minutes until slightly thickened. Remove from heat and stir in the butter until melted. Discard the rosemary sprig.
- In the last 5 minutes of roasting, sprinkle the chopped pecans over the potatoes so they toast slightly.
- Drizzle the warm orange-rosemary glaze over the roasted sweet potatoes just before serving.
Why everyone loves it: They look stunning on the table and taste even better. The glaze is the perfect balance of sweet, citrusy, and herbal.
Recipe 4: Roasted Garlic Mashed Potatoes
Creamy, dreamy mashed potatoes with the deep, sweet flavor of roasted garlic.
Ready in: 1 hour
Serves: 8 people
What you need:
- 3 lbs Yukon Gold potatoes, peeled and cut into chunks
- 1 whole head of garlic
- 1 teaspoon olive oil
- 1/2 cup warm milk
- 1/2 cup sour cream
- 4 tablespoons butter
- Salt and white pepper to taste
- Chopped chives for garnish
How to make it:
- Roast the garlic: Preheat your oven to 400°F. Slice the top off the whole head of garlic to expose the cloves. Drizzle with olive oil, wrap in foil, and roast for 35-40 minutes until the cloves are soft and golden brown. Let cool, then squeeze the soft garlic paste out of the skins.
- While the garlic roasts, place the potato chunks in a large pot. Cover them with cold, salted water. Bring to a boil and cook for 15-20 minutes, until the potatoes are very tender when pierced with a fork.
- Drain the potatoes very well. Return them to the hot pot for a minute to let any extra moisture evaporate.
- Mash the potatoes with a potato masher or ricer.
- Add the warm milk, sour cream, butter, and the roasted garlic paste. Stir vigorously until smooth and creamy.
- Season generously with salt and white pepper. Garnish with chopped chives before serving.
Why everyone loves it: The roasted garlic adds a wonderful, mellow flavor that makes these mashed potatoes unforgettable. They are the ultimate comfort food side dish.
Recipe 5: Garlic Lemon Parmesan Roasted Brussels Sprouts
These crispy, caramelized Brussels sprouts will make everyone a fan.
Ready in: 30 minutes
Serves: 6 people
What you need:
- 2 lbs Brussels sprouts, trimmed and halved
- 3 tablespoons olive oil
- 4 cloves garlic, minced
- Zest of 1 lemon
- Juice of 1/2 lemon
- 1/2 cup grated Parmesan cheese
- Salt and black pepper to taste
How to make it:
- Preheat your oven to 425°F.
- On a large baking sheet, toss the halved Brussels sprouts with olive oil, minced garlic, salt, and pepper.
- Arrange them in a single layer, cut-side down. This helps them get crispy.
- Roast for 20-25 minutes, stirring once halfway through, until they are tender and deeply browned.
- Immediately after taking them out of the oven, toss the hot sprouts with the lemon zest, lemon juice, and grated Parmesan cheese. The cheese will melt slightly from the heat.
- Taste and add more salt or lemon if needed. Serve hot.
Why everyone loves it: The roasting brings out a natural sweetness, and the lemon Parmesan topping is bright and savory. They are an easy, crowd-pleasing vegetable side.
Recipe 6: Cranberry Apple Freekeh Stuffing
A modern, hearty stuffing made with freekeh, a nutritious ancient grain.
Ready in: 1 hour
Serves: 8-10 people
What you need:
- 1 1/2 cups cracked freekeh
- 3 cups vegetable or chicken broth
- 4 tablespoons butter
- 1 large onion, diced
- 2 stalks celery, diced
- 2 crisp apples (like Honeycrisp), diced
- 1 cup dried cranberries
- 1/2 cup chopped walnuts
- 1/4 cup fresh parsley, chopped
- 2 teaspoons dried sage
- Salt and pepper to taste
How to make it:
- In a medium pot, combine the freekeh and broth. Bring to a boil, then reduce heat, cover, and simmer for 20-25 minutes until the grain is tender and the liquid is absorbed. Fluff with a fork.
- Preheat oven to 350°F. Grease a 9×13 baking dish.
- In a large skillet, melt the butter over medium heat. Add the onion and celery and cook until soft, about 8 minutes.
- In a large bowl, combine the cooked freekeh, sautéed onion and celery, diced apples, dried cranberries, walnuts, parsley, and sage. Mix well. Season with salt and pepper.
- Transfer the mixture to the prepared baking dish. Cover with foil.
- Bake for 25 minutes. Remove the foil and bake for another 10-15 minutes until the top is slightly crisp.
Why everyone loves it: Freekeh has a chewy texture and nutty flavor that is perfect for stuffing. The sweet apples and tart cranberries make it a festive and healthy alternative to traditional bread stuffing.
Recipe 7: Roasted Sweet Potato Salad with Honey Cumin Vinaigrette
A warm, spiced salad that is full of color and flavor.
Ready in: 45 minutes
Serves: 6 people
What you need for the salad:
- 3 large sweet potatoes, peeled and cubed
- 2 tablespoons olive oil
- 1 teaspoon smoked paprika
- Salt and pepper
- 5 oz baby arugula
- 1/2 cup crumbled goat cheese or feta
- 1/4 cup pomegranate seeds
- 1/4 cup roasted pepitas (pumpkin seeds)
What you need for the vinaigrette:
- 1/4 cup olive oil
- 2 tablespoons apple cider vinegar
- 1 tablespoon honey
- 1/2 teaspoon ground cumin
- Salt and pepper to taste
How to make it:
- Preheat oven to 400°F. Toss the sweet potato cubes with olive oil, smoked paprika, salt, and pepper. Spread on a baking sheet and roast for 25-30 minutes, until tender and caramelized. Let cool slightly.
- Make the vinaigrette: In a small jar, shake together the olive oil, apple cider vinegar, honey, cumin, salt, and pepper.
- To assemble, place the arugula in a large serving bowl. Top with the warm roasted sweet potatoes, crumbled cheese, pomegranate seeds, and pepitas.
- Drizzle with the honey cumin vinaigrette just before serving and toss gently.
Why everyone loves it: It is a lighter side dish that still feels special. The combination of warm potatoes, peppery arugula, creamy cheese, and crunchy seeds is fantastic.
Recipe 8: Gluten Free Pumpkin Tart with Dark Rum
A rich, spiced pumpkin filling in a simple, press-in nut crust. The rum adds a wonderful depth of flavor.
Ready in: 1 hour (plus chilling)
Serves: 8 people
What you need for the crust:
- 1 1/2 cups almond flour
- 1/4 cup coconut sugar or brown sugar
- 5 tablespoons melted butter
- Pinch of salt
What you need for the filling:
- 1 can (15 oz) pumpkin puree
- 2 large eggs
- 1/2 cup pure maple syrup
- 1/4 cup coconut milk or heavy cream
- 2 tablespoons dark rum
- 1 teaspoon vanilla extract
- 1 teaspoon ground cinnamon
- 1/2 teaspoon ground ginger
- 1/4 teaspoon ground nutmeg
- 1/4 teaspoon salt
How to make it:
- Preheat oven to 350°F.
- Make the crust: Mix almond flour, sugar, melted butter, and salt until a dough forms. Press it firmly and evenly into the bottom and up the sides of a 9-inch tart pan with a removable bottom.
- Bake the crust for 10 minutes. Remove and let it cool slightly.
- Make the filling: In a large bowl, whisk together all the filling ingredients until completely smooth.
- Pour the filling into the slightly cooled crust. Smooth the top.
- Bake for 35-40 minutes, until the filling is set around the edges but still slightly jiggly in the very center.
- Let the tart cool completely on a wire rack, then refrigerate for at least 3 hours before slicing and serving.
Why everyone loves it: It is a decadent, gluten-free dessert that no one will guess is “alternative.” The rum flavor makes it sophisticated and uniquely delicious.
Recipe 9: French Pear Tart
An elegant, not-too-sweet tart with tender pears and a delicate almond cream.
Ready in: 1 hour 15 minutes
Serves: 8 people
What you need:
- 1 sheet store-bought puff pastry, thawed
- 3-4 firm but ripe pears (like Bosc or Anjou)
- 1 tablespoon lemon juice
- For the almond cream: 1/2 cup almond flour, 1/4 cup sugar, 4 tablespoons softened butter, 1 egg, 1 teaspoon vanilla extract.
- 2 tablespoons apricot jam, for glaze
How to make it:
- Preheat oven to 400°F. Roll out the puff pastry slightly and fit it into a 9-inch tart pan. Trim the edges. Prick the bottom all over with a fork. Chill while you prepare the pears.
- Peel the pears, cut them in half, and remove the cores. Slice them thinly lengthwise, keeping the slices together at the stem end. Place them in a bowl and toss with lemon juice.
- Make the almond cream: Beat the butter and sugar together. Mix in the egg and vanilla. Finally, stir in the almond flour until you have a thick paste.
- Spread the almond cream evenly over the bottom of the chilled puff pastry.
- Fan the pear halves slightly and arrange them on top of the almond cream, pressing them down gently.
- Bake for 35-40 minutes, until the pastry is golden and the pears are tender.
- Warm the apricot jam with a teaspoon of water. Brush this glaze over the warm tart for a shiny finish. Serve warm or at room temperature.
Why everyone loves it: It looks like it came from a fancy bakery but is surprisingly simple to make. The almond cream and pears are a classic, perfect pair.
Recipe 10: Hot Spiked Apple Cider
A warm, spiced drink that makes the whole house smell like the holidays.
Ready in: 20 minutes
Serves: 6 people
What you need:
- 8 cups (2 quarts) apple cider
- 2 oranges, sliced
- 4 cinnamon sticks
- 6 whole cloves
- 1 star anise (optional)
- For serving: 1 cup bourbon, whiskey, or dark rum (optional), Fresh orange slices and extra cinnamon sticks for garnish.
How to make it:
- In a large pot, combine the apple cider, orange slices, cinnamon sticks, cloves, and star anise.
- Bring to a gentle simmer over medium heat. Do not boil. Reduce heat to low and let it steep for 15-20 minutes to develop the flavors.
- Strain the cider into a heatproof pitcher to remove the spices and orange slices.
- To serve, pour about 6 oz of hot cider into each mug. For a “spiked” version, add 1.5 oz (one shot) of bourbon, whiskey, or rum to each mug. Stir gently.
- Garnish with a fresh orange slice and a cinnamon stick.
Why everyone loves it: It is the coziest welcome drink for guests. The alcohol is optional, so it is perfect for both adults and kids (make a non-alcoholic batch).
10 Fun & Easy Thanksgiving DIY Crafts
Get the whole family involved in making these simple decorations. They add a personal, festive touch to your home.
Craft 1: Gratitude Paper Chain
What you need: Colored construction paper, scissors, glue or stapler, markers.
How to make it: Cut the paper into strips. Each day in November, have family members write one thing they are thankful for on a strip. Form the strip into a circle and glue/stapler the ends. Loop the next strip through the first circle and connect it, forming a chain. Hang it up and watch your “chain of gratitude” grow all month long!
Craft 2: Pinecone Turkeys
What you need: Pinecones, colored felt, googly eyes, craft glue, small orange pipe cleaners (for feet), brown pom-poms (for heads, optional).
How to make it: Glue a brown pom-pom or a ball of crumpled brown paper to the front of the pinecone for the head. Add googly eyes and a small triangle of orange felt for a beak. Cut feather shapes from red, orange, and yellow felt. Glue them to the back of the pinecone to form the tail. Bend pipe cleaners into feet and glue them underneath. A cute table place card holder!
Craft 3: Leaf-Printed Placemats/Napkins
What you need: Plain cotton napkins or light-colored fabric placemats, fabric paint, brushes, autumn leaves (maple, oak, etc.).
How to make it: Lay a leaf vein-side up on a protected surface. Paint the back of the leaf (the side with the raised veins) with fabric paint. Carefully press the painted side onto your fabric. Peel the leaf away to reveal a beautiful print. Let dry completely.
Craft 4: Mason Jar Autumn Luminaries
What you need: Clean mason jars, Mod Podge, paintbrush, tissue paper in autumn colors (red, orange, yellow), tea light candles.
How to make it: Tear the tissue paper into small pieces. Brush a thin layer of Mod Podge on a small section of the jar. Press a piece of tissue paper onto it. Overlap pieces until the jar is covered. Seal with another thin layer of Mod Podge. Let dry. Place a tea light inside for a warm, glowing centerpiece.
Craft 5: Thankful Tree Centerpiece
What you need: A small branch with many twigs, a vase or jar, rocks or sand, small paper tags, string, a hole punch.
How to make it: Place the branch securely in a vase filled with rocks or sand. Cut paper into leaf shapes or use small tags. Have guests write their name and what they are thankful for on a tag. Punch a hole, tie with string, and hang the tags from the branches. It is a beautiful, interactive centerpiece.
Craft 6: Painted “Thankful” Pumpkin
What you need: A white or light-colored pumpkin, acrylic paints, brushes, permanent marker.
How to make it: Do not carve this pumpkin! Paint the word “THANKFUL” or “GIVE THANKS” in large letters on the front. Let dry. Family members can then use the marker to write things they are grateful for directly on the pumpkin all season long.
Craft 7: Corn Husk Angels
What you need: Dried corn husks (found in the Hispanic foods aisle), string or thin twine, small wooden beads, craft glue.
How to make it: Soak corn husks in warm water to make them pliable. For the body, roll a small rectangle of husk tightly. Tie with string near the top to form a head. For wings, fold a husk into a bow shape and tie it around the back. Glue a wooden bead for the head. Fluff the husk below the string to look like a dress. A rustic, beautiful ornament.
Craft 8: Festive Napkin Rings
What you need: Empty toilet paper rolls, autumn-themed ribbon, hot glue gun, small faux leaves, acorns, or berries.
How to make it: Cut each toilet paper roll into 1.5-inch wide rings. Wrap a piece of ribbon around a ring, overlapping the ends, and secure with hot glue. Glue on small decorative items like a faux leaf, a few acorns, or berries. A quick way to dress up your table.
Craft 9: Handprint Turkey Canvas
What you need: Small blank canvas, acrylic paints (brown, red, orange, yellow), paintbrushes, wipes.
How to make it: This is a kid favorite! Paint a child’s palm brown and fingers in different colors (red, orange, yellow). Press their hand firmly onto the canvas with fingers spread–this is the turkey’s body and feathers. Once dry, paint on a beak, eyes, legs, and the details. A keepsake you will treasure for years.
Craft 10: Acorn Frame Decorations
What you need: Small wooden or cardboard frames, collected acorns (caps on), strong craft glue.
How to make it: Remove the backing and glass from the frame. Starting from the outer edge, glue acorns side-by-side onto the frame, covering it completely. Let dry thoroughly. You can insert a photo, a quote about gratitude, or leave it as is for a natural autumn decoration.
Conclusion
Thanksgiving is a beautiful time to connect. We hope these recipes fill your home with wonderful smells and your table with delicious food. The DIY crafts are a fun way to get everyone involved and create decorations full of personal meaning.
Most importantly, take a moment to pause, reflect, and share what you are thankful for with the people around you. From our home to yours, we wish you a joyful, peaceful, and very happy Thanksgiving.